Building a DIY Meshtastic Node with ESP32 + Waveshare Pico-LoRa-SX1262
 This is my guide on how to build a meshtastic node from 2 parts that don’t necessarily fit neatly together. This will be a walk through on what I’ve done and what you should do so you don’t make the same mistakes as me.
What You’ll Need
| Component | Details |
|---|---|
| MCU | ESP32 DOIT DevKitV1 |
| Radio | Waveshare Pi-Pico-LoRa-SX1262 |
| Pinout Wires | Depending on your setup, my boards came with the pins sticking out so I use female to female cables. |
| Breadboard | Recommended for stable connections |
| USB cable | Must be a data cable, not charge-only |
- the cable thing seems pretty self explanatory but you’ll run into going to build the thing, trying to flash it and then it’ll just not work because you picked the wrong usb cable. Good idea to get some sorta label on your cables for future you.
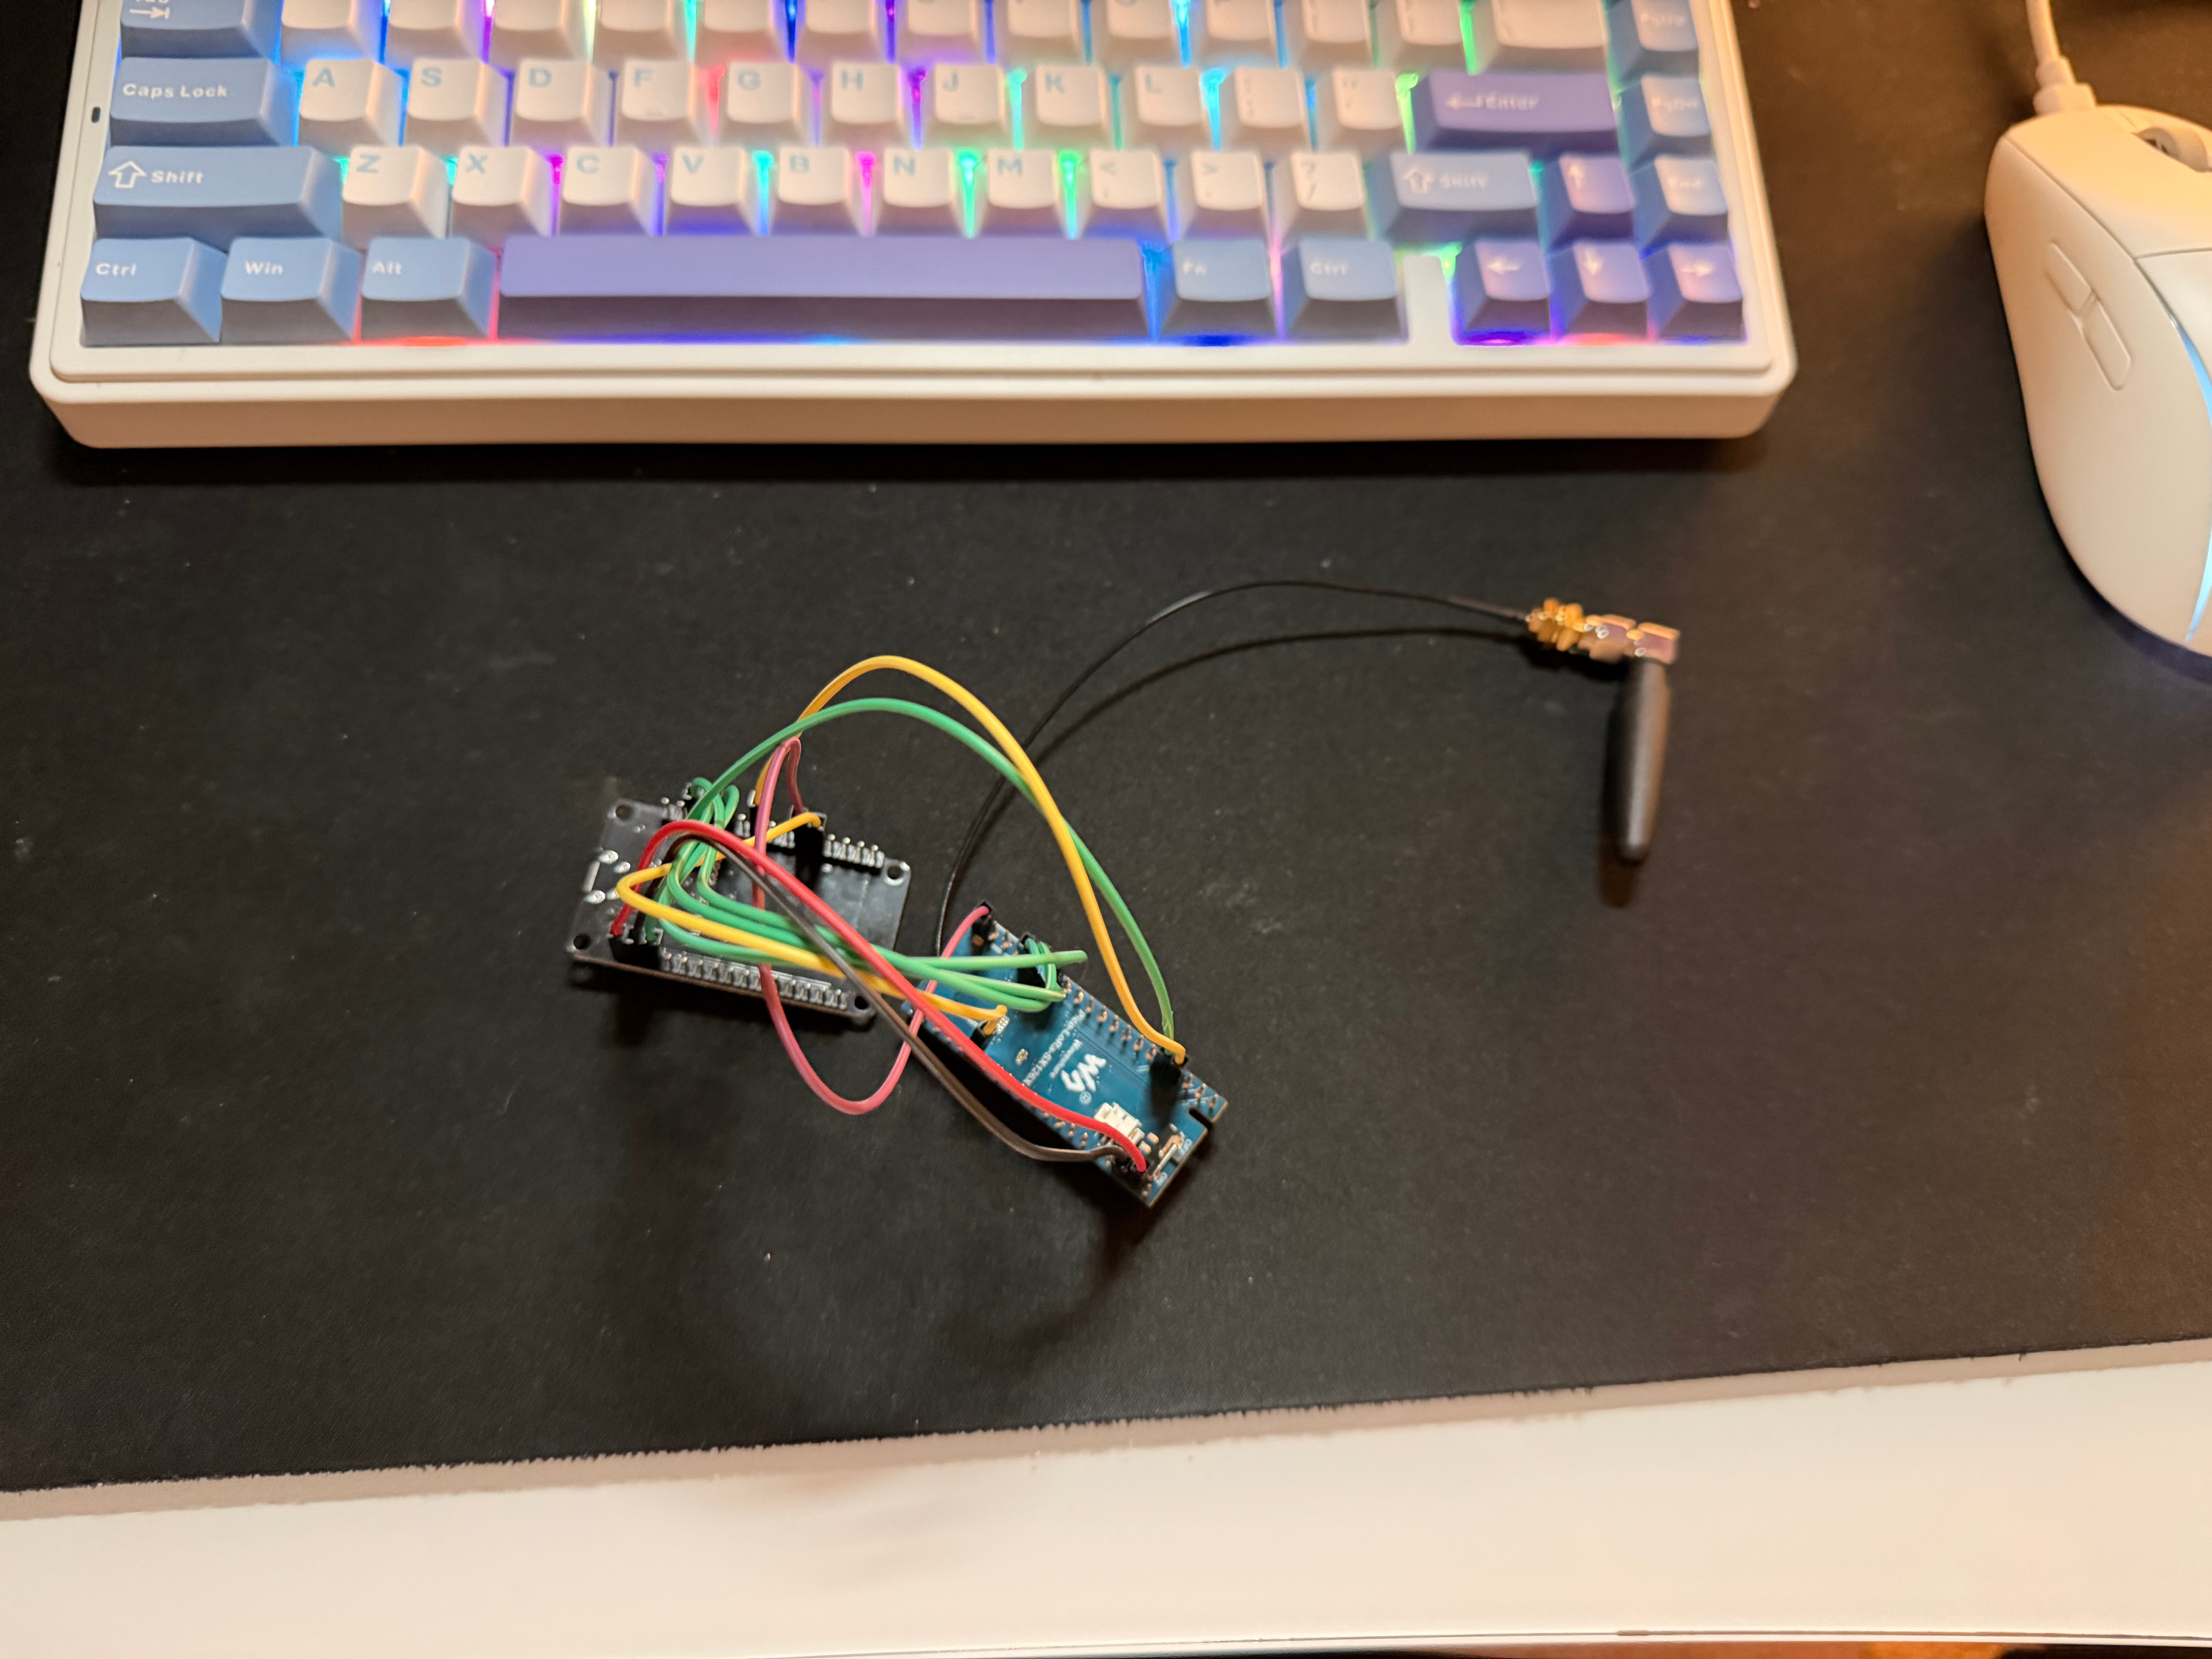
Wiring
The Waveshare Pico-LoRa-SX1262 is designed as a Raspberry Pi Pico HAT, so when using it with an ESP32 you need to wire the SPI pins yourself. The module runs at 3.3V logic only — don’t connect any signal pins to 5V.
Wire to the HSPI bus on the ESP32. Avoid VSPI (the default SPI bus) because GPIO 5 is a strapping pin that can cause unreliable boot behaviour when used as CS. (strapping pin mean that it’s used during boot up specifically GPIO 5 influences SDIO timing and flash configuration during boot.)
Pin Mapping
| SX1262 Signal | ESP32 GPIO |
|---|---|
| NSS (CS) | GPIO 15 |
| SCK | GPIO 14 |
| MISO | GPIO 12 |
| MOSI | GPIO 13 |
| BUSY | GPIO 26 |
| DIO1 | GPIO 35 |
| RESET | GPIO 32 |
| 3.3V | 3.3V |
| GND | GND |
GPIO 35 is input-only on the ESP32, which makes it ideal for DIO1 (interrupt line). GPIO 12 is a strapping pin — it needs to be low at boot. Since MISO is idle-low this is fine in practice, but worth knowing if you hit boot issues.
References:
Environment Setup
I personally use arch on my system, if you’re sane you’ll use debian or fedora so everything here kinda applies to me but should be copy-able to other systems. I use a lot of venv since Arch doesn’t allow you to shotgun your systems full of python files.
Arch Linux
Arch blocks system-wide pip by default (PEP 668), so PlatformIO needs to live in a virtual environment:
python3 -m venv ~/.venv/pio
source ~/.venv/pio/bin/activate
pip install platformio
Clone the Meshtastic Firmware ( if you want to write code and steps with me )
git clone https://github.com/meshtastic/firmware meshtastic_firmware
cd meshtastic_firmware
git submodule update --init --recursive
Or you can clone my repo and simply use my build here:
git clone https://github.com/Betim-Hodza/meshtastic-esp32devkit1-wavesharesx1262lora.git
cd meshtastic-esp32devkit1-wavesharesx1262lora
git submodule update --init --recursive
Flashing the Firmware
The Boot Sequence
The ESP32 DevKitV1 requires you to manually enter flash mode. The sequence is:
- Hold the BOOT button
- Press and release the EN (reset) button
- Release the BOOT button
- Run the upload command immediately after
pio run -e esp32devkit1_waveshare_sx1262 -t uploadEasy and quick you would be done!
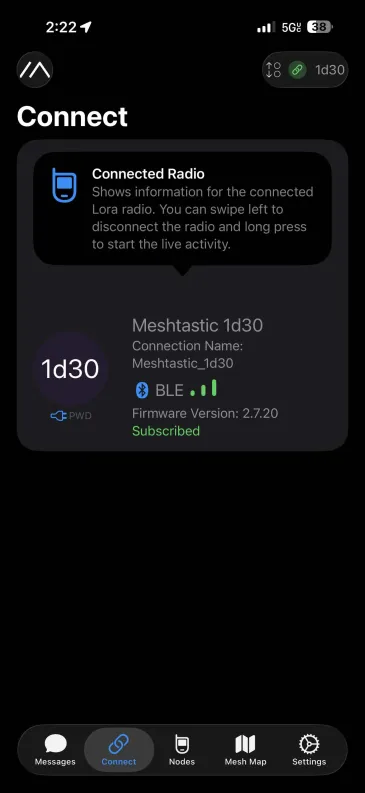
Validation
To check that it’s really working, make sure your device is powered and open the meshtastic app and connect to your node with bluetooth, you should see something like this:
Creating the Custom Variant
Meshtastic doesn’t ship a pre-built firmware for a bare ESP32 DevKitV1 + SX1262, so you need to create a custom variant. A variant is just a small folder of header files that tells the firmware which pins map to which functions.
Directory Structure
Create this folder inside the firmware repo:
variants/esp32/diy_sx1262/
├── variant.h
├── pins_arduino.h
└── platformio.ini
variant.h
This is the probably the most important file you’ll touch, it defines your pin assignments and radio configuration.
#pragma once

#define PRIVATE_HW
#define HW_VENDOR meshtastic_HardwareModel_PRIVATE_HW

#define USE_SX1262

#define SX126X_CS     15
#define SX126X_SCK    14
#define SX126X_MISO   12
#define SX126X_MOSI   13
#define SX126X_RESET  32
#define SX126X_DIO1   35
#define SX126X_BUSY   26

// The Waveshare module uses DIO2 for its internal antenna switch
#define SX126X_DIO2_AS_RF_SWITCH true

// The Waveshare module has a TCXO running at 1.8V
#define SX126X_DIO3_TCXO_VOLTAGE 1.8f

#define SERIAL0_RX_GPIO 3
#define SERIAL0_TX_GPIO 1

// Built-in LED on the DevKitV1
#define LED_PIN 2
#define LED_STATE_ON HIGH
Common mistakes to avoid:
- The pin macros must use the
SX126X_*prefix —LORA_*will not work and will produce undeclared scope errors HW_VENDORmust include themeshtastic_prefix — without it you’ll get a redefinition warning on every compiled file
platformio.ini
Put this inside your variant folder. The root file auto-discovers variant configs via extra_configs, so adding it there instead causes RadioLib headers to not be included correctly.
[env:diy-sx1262]
extends = esp32_base
board = esp32dev
build_flags =
    ${esp32_base.build_flags}
    -D PRIVATE_HW
    -I variants/esp32/diy_sx1262
Building the Firmware
From the firmware root directory:
pio run -e diy-sx1262A successful build looks like this:
RAM:   [====      ]  37.9% (used 124172 bytes from 327680 bytes)
Flash: [========= ]  91.5% (used 2219049 bytes from 2424832 bytes)
[SUCCESS]
If you need to do a clean rebuild:
pio run -e diy-sx1262 -t clean
pio run -e diy-sx1262
Flashing the Firmware
The Boot Sequence
The ESP32 DevKitV1 requires you to manually enter flash mode. The sequence is:
- Hold the BOOT button
- Press and release the EN (reset) button
- Release the BOOT button
- Run the upload command immediately after
pio run -e diy-sx1262 -t uploadVerifying It Works
To check that it’s really working, make sure your device is powered and open the meshtastic app and connect to your node with bluetooth, you should see something like this:
First-Time Configuration
Once the node is running, and you’re connected to it via the Meshtastic app (Android/iOS) over Bluetooth.
The first thing you must do is set your region — the node will not transmit until this is configured. In the app go to Radio Config → LoRa and set the region appropriate for your country (e.g. US, EU_868).
You can also monitor and configure the node from the terminal using meshtui:
Receiving ModulesConfig from device.
File: /prefs/channels.proto
File: /prefs/config.proto
We've received all config from the device! (Checksum 2625206615)
If you see Routing Error errorcode 4 — that’s NO_CHANNEL, which means the region hasn’t been set yet. Set it in the app and it will go away.
Troubleshooting
| Symptom | Likely Cause | Fix |
|---|---|---|
/dev/ttyUSB0 not detected | Charge-only USB cable | Use a data cable |
SX126X_CS was not declared | Wrong macro prefix | Use SX126X_* not LORA_* |
RadioLibHal does not name a type | platformio.ini in wrong place | Move env block into variant folder |
HW_VENDOR redefined on every file | Missing meshtastic_ prefix | Use meshtastic_HardwareModel_PRIVATE_HW |
| Upload fails at 921600 baud | Baud rate too high | Add upload_speed = 460800 |
| Upload fails entirely | Boot sequence not done | Hold BOOT, tap EN, release BOOT |
| No BLE visible in app | Boot failed | Check serial monitor output |
Routing Error errorcode 4 | Region not set | Set region in Meshtastic app |
| LoRa init failed | Wiring issue or wrong TCXO voltage | Recheck wiring; try SX126X_DIO3_TCXO_VOLTAGE 0.0f |
My future next steps
- cable → breadboard — move from pinout cables to a breadboard, then eventually solder onto perfboard with female pin headers for both modules
- Enclosure — a small handheld enclosure to make it a portable device
- Battery — power
- e-ink display — display messages on the screen